Preview of Diannemurray's blog at TravelPod. Read the full blog here: www.travelpod.com This blog preview was made by TravelPod using the TripAdvisor™ TripWow slideshow creator. Entry from: Adelaide, Australia Entry Title: "Exploring South Australia" Entry: "2008 South Australia and Flinders Ranges Trip Day 1 - 16 Sept 08 Balmain to Oura Beach 470 km Loading of the car complicated by having to get the roof pod "Poddy" from Jerry's place and having to park out the front to load the car because Poddy will not fit in the car park. Not game to pack the night before, as we've recently had someone steal our camera from the car, while it was parked in our car park, by using a jimmy to smash the window. Departure further slowed by the need to buy an inverter for the car in Alexandria so we can charge phones, the Palm Pilot, and our new camera from the car, as we don't expect to see 240V AC power for a while. The gear all fits in, but the back is pretty full with our two roller packs, the mattress (which has been cut to fit around the wheel arches), a fridge, an esky, four plastic food boxes, the water container, boot bag, book bag, technology box, tool kit and sundries. A plywood sheet helps loading the boxes and moving them around without tearing the mattress cover. Not a lot of room for sleeping in the car without turfing out all the waterproof items. It is pretty cold and getting colder, and by the time we stop for a late Macca's lunch near Goulburn, it is pretty bitter. This ...
Thursday, December 29, 2011
Sunday, December 25, 2011
Saving Money with Energy Efficiency: Going Green, Getting Green
Practical things you can do right now to save money on energy cost in your home. Includes "Do It Yourself" projects, energy efficient products, and work you can have professionally done. Brought to you by the Massachusetts Department of Energy Resources at www.mass.gov
Prices Black And Decker Garage Storage Low Price 3200 Stethoscope Cheaper Evenflo Tandem Strollers
Tuesday, December 13, 2011
Creating Perfect Ribs in Your Smoker
In all honesty, I love ribs, but I hate the ribs that the vast majority of establishments serve. Rarely do I get ribs that are done properly as most tend to be either dry and leathery, or soft and mushy. Worst part is, most of these establishments believe that slathering the ribs in a barbecue sauce will bring them back to edible status. Well they are wrong...all it serves to do is add to my frustration by making the meal messy.
While very few, if any, chefs, pit masters, or home-cooks strive to achieve a leathery finish, you do hear the statement that "falling off the bone" is the way to go. While I agree that tender and soft is the ultimate goal, any competition rib that completely falls off the bone is considered completely over-done. A truly perfect rib will adhere to the bone, but fall off when tugged. So my goal with this post is to show you how to achieve a perfect rib at home. The key to good ribs has four components - the rub, the smoke, the heat, and the time. Let's begin with the rub.
The point of using a rub is to develop a flavor base and to create a crust or bark on the ribs. Depending on where you go and whom you talk to, the rubs you have to choose from will reflect regional influences. Some will be hot and spicy, whereas others will be sweeter. I am partial to the Pork and Poultry Blend from Caroline's Rub, which has a more typical Texas flavor - more savory than sweet. I like sweet, don't get me wrong, but I prefer my ribs with more kick than candy, so I let my wood choice add the sweetness. Before applying the rub, the first thing I do is remove the thin skin that covers the back side of the ribs. Using a filet knife, I loosen it from one end, grip it with a paper towel, and then pull it off in one easy motion. While you don't absolutely have to remove this skin, taking a few extra seconds to do so will definitely improve the tenderness of your final outcome. I then rinse and thoroughly dry the ribs, and follow that with a thorough coating of my chosen dry rub. How much you use, will entirely depend upon you. I like a thicker coating, some will prefer less. Next take the coated ribs, and tightly wrap them in plastic wrap, place in the refrigerator and let sit for at least 3 hours. This will give the rub time to penetrate and flavor the ribs. Once the ribs have sat, remove from the refrigerator and allow them to return to room temperature before putting on the smoker.
While the rub adds an immediate kick of flavor, the smoke you choose will work to complement the rub, and add that flavor we all recognize as barbecue. With meats such as pork ribs, I like to kiss the meat with smoke from pecan and cherry woods. The pecan is very similar to hickory in flavor, without the strong bite that can sometimes overpower the lighter meat of the ribs. The addition of cherry wood to the mix serves to work with the pecan to sweeten the meat.
Next factor for success is heat. While there are a thousand ways to cook ribs, many of which yield a truly great product, I prefer slow smoked ribs. Nothing gets my blood pumping like the smell of slow smoked barbecue. I have always found that higher temperatures result in tougher ribs, so my goal is to maintain a low heat level of around 215F to 225F in the smoker (or in your oven at home). This temperature range has yet to fail me. Once I have the smoker where it consistently holds the temperature within this range, I will place the ribs standing in a rib rack, inside for cooking.
Finally, the last factor for creating successful ribs is the cooking time. While many folks insert a thermometer in their ribs to determine doneness, I prefer simply watching the bones. For an average rack of baby back ribs, you can assume a cooking time of between 3 ½ and 4 hours at the temperatures I recommend. The easiest way for me to determine if my ribs are done is to perform two steps, starting with the first at the 3 hour mark - look at the bones. If I have a good ¼ - ½ inch of bone showing, I then perform step two, which is to take a toothpick and insert into the meat. If it slides through will little resistance, like going through butter, the ribs are done. You will want to watch them closely as they will go from done to overdone fairly quick.
Once cooked, I like to let the ribs rest for at least 10 minutes to allow the juiced to evenly distribute themselves within the meat, which will keep things tender and moist. Like I said earlier, I don't like messy, so I tend to serve the ribs dry, with a side of my favorite barbecue sauce for dipping.
Following this method has consistently provided me with ribs that are succulent, moist, and truly satisfying.
Thursday, December 8, 2011
What's the Right Temperature for Refrigerator? (Kitchen Tips)
Kitchen Tips: What's the Right Temperature for Refrigerator? - as part of the expert series by GeoBeats. A lot of cooks ask me 'what is the right temperature for the refridgerator'. And the best rule of thumb is under 40 degrees Fahrenheit. Obviously you do not want to go down to 32 degrees because then everythings going to start freezing especially in the back of the refridgerator. But if you can keep it to around 38 degrees to 40 degrees at the most. It will ensure fresh poultry, meat and fish. If you do not have a special thermometer for your refrigerator and there is no reason why you should simply take one of these. Most cooks have this. It is a typical thermometer that you use for roast for almost any type of cooking. This particular thermometer starts at 0 degrees Fahrenheit and goes up to 220. You do not need that but make sure whatever thermometer you have is going down to around zero to above 40. When you put it in your fridge, make sure you leave this protective plastic sleeve on. Because here is how the thermometer works: this little tiny tip, this is what really registers the temp. If this is hitting a piece of metal or a metal bowel in the fridge, it can make the air seem cooler than it really is, and that really can throw things off and accelerate spoilage. So keep this on, pop it in your fridge for half hour, see what the temp is and then adjust accordingly.
Miele Vacuum S4212 Immediately Good Bargain Snoqualmie Lodge
Sunday, December 4, 2011
Thermistor Thermometer: Reliable Temperature Measuring Tool
A Thermistor thermometer is referred to as a semi conductor device that has electrical resistance and found to be proportional to temperature. Basically the word Thermistor formed with the combination of two words named as 'resistor' and 'thermal'. These are known to be the type of resistor with electrical resistance carrying positive or negative temperature resistance which decreases by 3% per degree Celsius.
Basically there are two kinds of thermistors which are referred to as PTC means Positive Temperature Coefficient of Resistance and NTC meaning Negative Temperature Coefficient of Resistance. NTC are the forms which have inverse relation with temperature and resistance of the object which means that when there is an increase in the temperature of the object there will be a proportional decrease in the resistivity too. Simultaneously if there is a decrease in temperature the resistant level will have an increase.
Whereas the PTC are concerned they witness the same change in the temperature and resistance which means that when there is an increase in the temperature the resistance will also get increase and when there is a fall in temperature reading of the object the resistivity too will decrease.
It's Incredible Uses:
• The thermistors are widely used these days in numerous medical, applications. It is appropriately used in clinical stethoscopes or by way of probes at the time of surgery as well as in various medical units to avoid overheating in circuits, such as X-Ray and ECG machines, MRI Scanners, Blood dialysis equipment Infant incubators, etc.
• We may find their effective usage in home gadgets like cell phones, computers, amplifiers, cars, Air conditioners, Clothes dryers, Dishwashers, Electric water heaters, Fire detectors, Home weather stations, Oven temperature control, Refrigerator and freezer temperature Control, Toasters, Washing machines.
• Whereas industrial applications are concerned it has a main role to play in gadgets like Fluid flow measurement, HVAC equipment, Photographic processing equipment, Plastic laminating equipment, Water purification equipment, Welding equipment, Gas flow indicators, vending machines, Aircraft temperature, Missiles and spacecraft temperature, Satellites, etc.
Most popular model in this category is manufactured by Barnant which offers you with incredible specifications as temperature measuring range from 32 to 122°F or 0 to 50°C, large dual display, overrange, underrange, and low-battery indications, Open sensor, DT function to display the differential temperature relating to current plus assessed one, memory storage function up to 99 temperature readings, recall option, automatic or manual field calibration, Splash or shatterproof resistant and with 1/4" probe with plug connector.
Thermistor thermometer is compact, durable, reasonable and user-friendly device that can be used to measure the precise temperature of food, human being, animals, industrial gadgets, etc. These are found to be more instant and accurate as compared to the traditional or analog ones. Few steps on how to use this device:
• The first thing that you need to undertake is switch on the measuring unit.
• After that check the temperature reading status of the unit means it should be on zero level. In case it is not set it down by pressing the reset button on the device.
• Once you are done with this, hold the probe of the unit and make it to contact directly with object or subject you desire to measure. However in case of food you need to insert the probe nearly half inch deep into it and that too once you are finished with the cooking process.
• Later on wait for seconds till you hear a beep sound.
• Then remove the unit out of the measured object or subject and check the temperature reading over the display screen of the gadget.
Thursday, December 1, 2011
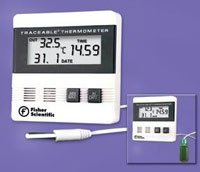
Part# 15-077-976 - Thermometer Lab Traceable Fridge Dgt LCD Dual Wlmnt 6' Cbl Ea By Fisher Scientific Co.
!±8± Part# 15-077-976 - Thermometer Lab Traceable Fridge Dgt LCD Dual Wlmnt 6' Cbl Ea By Fisher Scientific Co.
Brand : Fisher Scientific Co. | Rate :  | Price :
Post Date : Dec 01, 2011 03:24:18 | Usually ships in 2-3 business days

| Price : Post Date : Dec 01, 2011 03:24:18 | Usually ships in 2-3 business days
- This listing is for 1x Unit
Nfl Hitch Covers Buy Online Life Fitness 9500hr Recumbent Bike Best Saved Recumbent Bikes Used
Sunday, November 27, 2011
Thermometers, Fridge, Oven, Meat, Candy and Coffee Maven Supplies
Buy Online Australia wide Shipping www.mavensupplies.com.au www.mavensupplies.com.au www.mavensupplies.com.au www.mavensupplies.com.au www.mavensupplies.com.au
Great Deals Doula Services Peltor Ear Protectors Free Shipping Save Shure Model
Thursday, November 24, 2011
Monday, November 21, 2011
DIY Repair On Your Refrigerator
It's no at all uncommon to see your refrigerator functioning great and then you suddenly notice come, well you would not come close to calling them malfunctions, but yeah, it seems like suddenly your refrigerator is not functioning great anymore. What should you do? Most people will call the repairman and pay for their services. Some will just ditch the fridge and buy a new one.
The second option is not at all practical, unless your refrigerator is like 10 years old and have been showing signs of age already. Nonetheless, if this is not the case, don't replace your fridge right away. The first option is actually very common; when we encounter problems with the refrigerator, or any other appliances, it seems that the most sensible thing to do is to call for help.
But why pay for these repair service when you could repair the refrigerator yourself? Seems impossible? Many people have actually been doing do-it-yourself repair works on their refrigerator so you can do it, too. You need not be an expert on handling appliances; all you need to do is follow these simple guidelines.
My fridge is not cool!
A typical refrigerator should have a temperature of 38 to 40 degrees Fahrenheit in order to store and preserve your food properly. A warm refrigerator is not a problem to ignore as this may cause your food to spoil. If this happens, check the thermometer inside the refrigerator. The first thing you can do is adjust the temperature through the thermometer.
Wait for the temperature to gradually set in but if after 6 hours and the temperature still did not change, check the fan. If the fan runs just fine, check the condenser coils, which may be located at the front while most are found in the back. To check the condenser coils, remove the cover and using a vacuum cleaner, remove the dust and dirt. You can also use a stiff brush or you may prefer to wash them with soapy water, especially if the dirt has hardened or are greasy.
Another reason for the warm temperature may be that you haven't defrosted lately, especially if your fridge needs to be manually defrosted. If so, defrost the refrigerator by turning it off and removing all the food items inside the freezer and refrigerator. Leave the freezer and refrigerator door open overnight. In the morning, replace the food, turn the fridge on and put the thermostat on a middle setting.
If you have done all the things above and still find your refrigerator warm, it may be time to replace your door seal. Broken door seals fail to seal in the cool air and allows warmer air from outside to enter. You can test you door seal by placing in a piece of paper on the door seal and then close the door. If you can remove the paper easily, then that is a sign your door seal is not working well.
Leaks and puddles on the floor
A common refrigerator problem, water that leaks from the refrigerator down to your floor may come from different sources and different causes. One of the most likely reason is that the lines of the water and/ or ice dispenser of the fridge are broken. These broken lines may have to be replaced. That may be the cause for leaks unless of course, you do not have water dispenser on your fridge.
Another cause of leaks may be the defrost tray or drain pan underneath the refrigerator. If you fridge has this, check it for damages, cracks and even holes. After that, clean the drain tube which can be located in the floor of the fridge or at the back. Pour a mixture of hot water and bleach through the opening using a turkey baster. After cleaning, empty the drain pan of water.
Finally, leakage and water spills may come from a clogged drain in the freezer. If this happens, you can usually find the water dripping from the ceiling of your refrigerator (if your fridge has the freezer on top of the body). If this is the case, the solution is to unclog the drain the freezer or to dry the insulation by removing first the divider of the fridge and the freezer.
Noisy neighbors, noisy fridge
Another very common problem that you can fix yourself is the noise coming from your fridge. Many people will often ignore and even dismiss this problem, thinking that the sounds are just signs that the motor is working. On the other hand, these noise we hear may be a sign of something else, and that there may be something wrong with your fridge.
Like water spills and leakage, these noises may also come from different sources. However, the most common source is from the inside of the fridge. When this happens, it is probably the fan that is causing it. If your refrigerator is quite old, the fan will omit noise, which may vary from chirping to squealing to full out groaning. If the noise becomes too loud, it may be a sign that your fan is already worn down and may need to be replaced.
Cheep Lamp Sets Promotional Salt Water Swimming Pool Chlorinator Best Buy Switchable Grow Lights
Sunday, November 13, 2011
Igloo FR180 1.7-Cu-Ft Stainless Steel Door Refrigerator

!±8±Igloo FR180 1.7-Cu-Ft Stainless Steel Door Refrigerator
Brand : IglooRate :
Price : $99.99
Post Date : Nov 13, 2011 08:00:33
Usually ships in 1-2 business days
Igloo FR180 1.7 cubic-foot stainless steel door refrigerator, CFC free, low energy consumption, softline and reversible door, slide out shelves, flush back design, invisible door handle
Wednesday, November 9, 2011
Fisher Scientific Traceable Refrigerator/Freezer Alarm Thermometer, Single range: -40° to +50°
!±8± Fisher Scientific Traceable Refrigerator/Freezer Alarm Thermometer, Single range: -40° to +50°

Rate :
| Price : | Post Date : Nov 09, 2011 08:16:46Usually ships in 1-2 business days
Includes: Velcro* and magnetic mounting strip; one "AA" battery; ABS plastic case. Features: Monitors temperature in freezers, refrigerators, incubators, water baths, and heating blocks. Triple display simultaneously shows current, high, and low temperatures. Alarm (on 06-664-11 only) set in 1° increments alerts user with visual and audible signals if temperature goes outside setpoints. 10 ft. long (3m) microcable. Dimensions: 41/4L x 23/4W x 3/4 in.H (11 x 7 x 2cm). One Year Warranty. The product referenced on this detail page is sold be Each.
- Fisher Scientific Traceable Thermometer with Time/Date And Max/Min Memory; Fdigital
- Fisher Scientific Traceable Digital Thermometers With Short Sensors; Type: Combined Scale; Dual Range
- Manual Blood Pressure Cuff Large Adult
- Taylor Food Service Classic Series Freezer-Refrigerator Thermometer, Large Dial
- Brother TN-650 Toner Cartridge
Celestron Nexstar Slt Order Now Freeze Dried Emergency Food Review Order Nuk Learner
Subscribe to:
Posts (Atom)
|
|
|
|
|
 |
 |
 |
 |
 |
 |
 |
 |